
September 06, 2021 575 words 2 minutes to read
Easily Normalize RGB with Auto-Linear Fit
Have you ever opened an image from a recent observation only to find it is washed out and looks purple, pink, red, blue, or green? This is common with my sessions. I used to manually use ChannelExtraction to separate the RGB channels, then LinearFit to normalize the channels, and finally uses LRGBCombination to apply them back to the original image. After doing this about a dozen times, I finally broke down and wrote a script to automate it. I call it Auto-Linear Fit.
I made a short video to explain the script and show it in action.
The breakdown is simple. Here is the main dialog:

The options include:
- Use minimum channel This picks the lowest intensity channel as the baseline for normalization. Unchecked this to choose the highest intensity channel instead.
- Create new instance By default, the script will apply changes to the original image to preserve history. Check this to leave the original untouched and generate the result in a new instance.
- Preserve individual channels The script will close the R, G, and B channels when it finishes unless you check this box.
- Reject low/high This is passed to the LinearFit function to handle clipping low and high range values.
- Lightness This will change the overall lightness (luminance channel) of the final image. Values below 0.5 will make it lighter, above 0.5 will make it darker.
- Saturation Slide below 0.5 to increase the saturation and above 0.5 to reduce it.
- Chrominance noise reduction The LRGBCombination can process noise and remove colored blotches and pixels that are introduced by the saturation function.
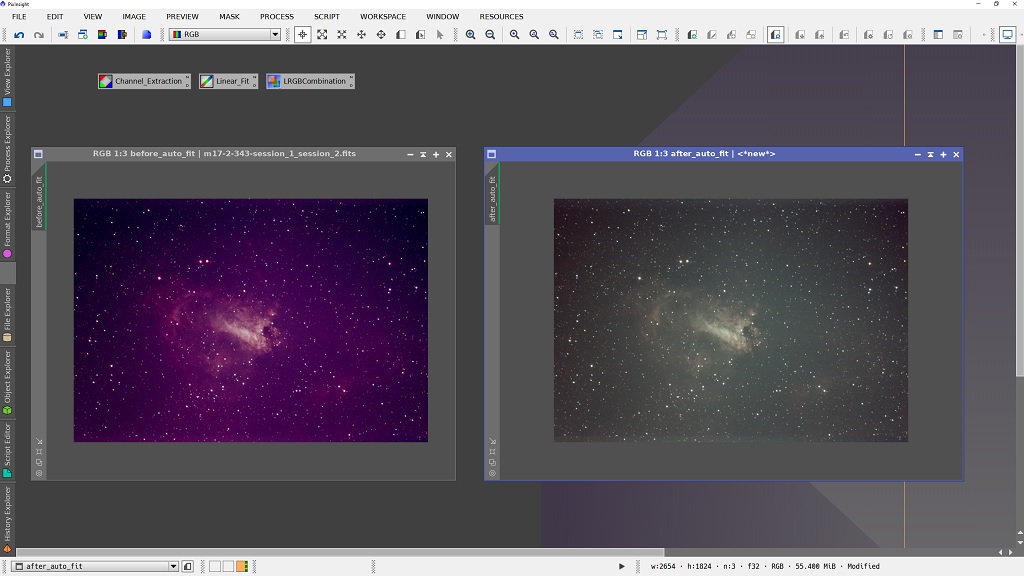
To give you an idea of how the different settings work, here is M17: The Omega Nebula, with a strong blue channel:

This is after Auto-Linear Fit with the default settings (use minimum channel):

This one uses the maximum channel (minimum channel unchecked):

This adjusts the lightness up (setting 0.2):

This adjusts it down (setting 0.8):

Here’s the desaturated image (setting 0.8):

For this one, I set saturation to 0.2:

And the same setting with noise reduction checked:

Enjoy the script! You can download this along with all of my scripts at:
https://github.com/DeepSkyWorkflows/DeepSkyWorkflowScripts
Regards,
Jeremy
Post categories: Related tags: