
July 31, 2021 2787 words 11 minutes to read
Finding redemption in M33: The Triangulum Galaxy
Summary
This post shares a story about a journey that began a year ago to successfully image M33: The Triangulum Galaxy.
The journey
It was a time of long, cool nights and I had just received my Stellina unit. I had no clue how anything worked or what I was doing. Like most people new to astrophotography, I was so in awe of my options that I never lingered on a target for long. I had no idea of how targets are positioned, so if it ended up pointing at the side of my house, I just continued on. One target that was low in the horizon was M33. This would be my first galaxy, and from other pictures I’d seen it was a beautifully detailed galaxy.
I pointed the telescope. Stellina reported in.
- moving to the target
- checking position accuracy
- pointing at the target
- tracking activation
I was greeted with a wave of status updates until the magical ring appeared. I let it run for what seemed like an eternity (several minutes) then closed it, disappointed. Here’s what I had to work with:

I briefly touched M33 the next night, then a few days later courted it a bit longer. In fact, after several hundred frames, the details began to appear.

That’s all I knew how to do, and the galaxies were shifting out of my observation areas, so that was it for me. A few months later I was learning how to use PixInsight and process the raw images. I went back and tried desperately to combine the sessions in a meaningful way. The results were awesome to me (because space) but nothing I would necessarily share with friends. Here was the best I could do with limited, noisy frames (and limited knowledge):

Fast forward to a warm night in July. I was picking a new target as my old one moved out of visibility. Using my favorite planning app, Stellarium, I noticed M33 was low on the horizon, but in a direction I might be able to observe. I updated the coordinates and pushed the “start observation” button. I didn’t have to wait long. Stellina was soon tracking the target and saving images. If you’re not familiar with Stellina, it has built-in software to process images on the fly as they come in. 383 frames later, I was staring at a much nicer image:

I picked up images on two other nights and loaded them eagerly into AstroPixel Processor, my calibration and integration software of choice. It does a great job of integrating multiple sessions. I had over 1,000 subframes to process so I told the software to discard the worse 10% and process the rest. Hours later, I had an image to load into PixInsight.
PixInsight Workflow
I used a typical workflow with a few twists and turns. It’s not uncommon for me to go down one path, not like the results, and roll back to try different options. My high-level phases are:
- Getting the baseline shape, background, and colors right
- Tackling noise
- Shaping stars
- Stretching
- Improving contrast and diminishing the background
- Touch-up and second round of noise
Get the basics right
I don’t neutralize backgrounds automatically because sometimes you lose finer details and I might want to preserve the signal of a particular channel. Therefore, the red, green, and blue channels of the image were out of whack.

My first step is to go overboard on the Screen Transfer Function (STF) by clicking the boosted stretch button. I then orient the image using FastRotation and crop it using DynamicCrop.

Next, I want to normalize the channels. I do this so often that I wrote a script for it named Auto-linear fit.

The default steps are:
- ChannelExtraction to separate out the red, green, and blue channels
- Compute the channel with the lowest mean
- Use LinearFit to normalize the other two channels
- Run LRGBCombine to push the normalized channels back into the main image
Using the defaults, it ran and came back with this.

Next, I remove the background. I always see how AutomaticBackgroundExtraction (ABE) does and use that if I get a good result, but I did not. So, I opened up DynamicBackgroundExtraction (DBE) and started laying tiles. Here are the guidelines that I follow:
- Make the tiles as big as practical for the image. Images with a lot of space between stars get bigger sample sizes.
- Only place tiles where you want the true background to be. They should never overlap stars or areas of nebulosity.
- Try to include the extreme edges of the image.
- Overlap is OK.
- If some of the tiles are red, simply increase the tolerance level and click “resize all” until the red goes away. For M33, I had to raise the tolerance from 0.5 to 0.7.
- 99% of the time I use subtraction. If there is vignetting (a circle light pattern) I use division.
Here is the tile setup that I used:
")
I always keep an eye on the dialog box in case I accidentally land on a star. It stands out clearly:

Then I either delete the tile or move it to a better spot. Once I’m ready I apply. It’s successful if your tiles turn red. Reapply STF to see the results. I then create a preview over the largest area of background I can find without stars or nebulosity. I open BackgroundNeutralization (BN) and apply with the preview as a reference. With the background neutralized, my last step is to calibrate colors before dealing with noise. My favorite tool is PhotometricColorCalibration. It takes some learning to get used to it but it does an awesome job. The key is to enter a good approximate of the right ascension and declination of your object, put in the correct date, and enter the specifics of your imaging software. For example, my telescope has a focal length of 400mm and a pixel size of 2.4 arc seconds per pixel. Because I use a Bayer Drizzle algorithm to increase the pixel size of the image by a factor of 3, I have to divide my pixel size by 3 and enter 0.8.
💡 Tip: Usually the built-in search service works well. You input the image (like M33) and click “GET” and the coordinates are good enough to plate solve your image. Sometimes, however, the plate solving step fails so Photometric Calibration can’t run. Anytime this happens, I simply export the image as a JPEG (80% quality) and upload it to Nova astrometry to plate solve. I have yet to share an image it can’t solve, and it gives me whatever I need to enter into Photometric Color Calibration. It even plate-solved the background of a picture I took of my Stellina! <div class="post-img ">

<div class="post-image-description"> Stellina annotated </div></div>
Now the image was in good color shape, so it was time to take care of the noise.
Tackle noise
I usually hit noise with a dose of TGVDenoise followed by Multiscale Linear Transformation (MLT). First, a good mask is needed to protect the high signal areas and allow the lower signal to get processed. I usually create my “TGV mask” this way:
- Duplicate the image
- Use STF to stretch it
- Open HistogramTransformaton (HT), drag the STF instance icon onto HT and apply to stretch the mask.
- Use a CurvesTransformation on RGB/K with the first point set to 0.0 → 0.2 and 1.0 → 0.8. This ensures no area is completely unprotected, but also prevents areas from being overprotected and allows them to receive just a little love.
- Use the HistogramTransformation tool and move the middle slider left until the peak intensity is at the 50% mark.
- Apply the mask, inverted.
I make a preview and try to capture a sample of stars, nebula, and background to test. I run the function on the preview before applying the main image in case I need to tweak any settings.
Here’s the preview I made. The top image is the source and the bottom is after applying TGV. To make it easier to compare, I added a button to toggle images so you can see the transformation in place.


After that, I sometimes apply a multiscale linear transformation to further “clean things up.” With that done, it’s time to get the stars in shape.
Shape the stars
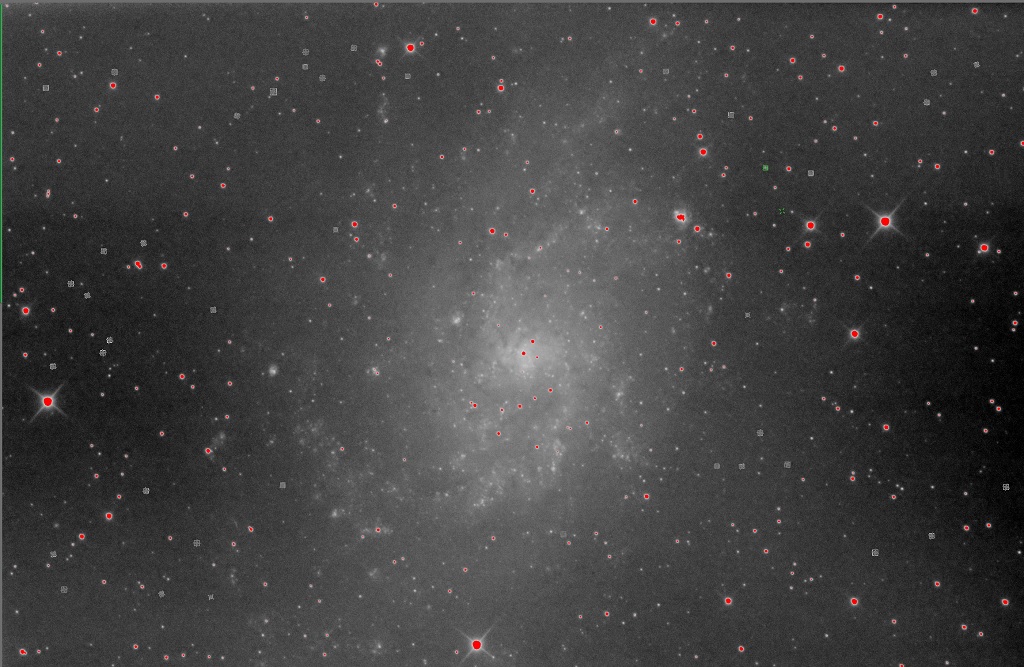
The atmosphere is like a huge lens that warps the light passing through it. Stars are single points of light at a distance, but the diffusion of light passing through air gives them “shape.” There are many ways to measure the “quality” of your stars. For example, eccentricity measures how oblong or “out of round” a star appears to be. Another common measure is full width half maximum (FWHM) or the distance from the center of the star that the intensity falls off by 50%. High FWHM values mean the star is more scattered/spread. There is not a perfect number to shoot for, but there are ways to improve the star quality of your image.
The main tool in the PixInsight toolbox for this is called Deconvolution. The algorithm takes an input that is an image that represents the average distortion of a star. The image is called a “Point Spread Function” or PSF for short. Here’s the PSF I used for M33:
")
I’ve tried many different ways to be successful at this, and my most effective approach is automated in another script called Generate Decon Support. It performs several steps. First, it extracts the luminance channel. That is saved to create the point spread function. It then stretches the mask and applies StarNet, a machine learning algorithm that removes the stars. The galaxy is left behind:

And the stars form a star mask. I apply a few iterations of MorphologicalTransformation using dilation to expand them, then run Convolution to blur the edges. This is, in my opinion, the best star mask money can buy. Next, I make a copy of the stretched luminance channel and Binarize it. This turns it into an effective on/off mask based on a cut-off that I usually set between 0.8 - 0.9. This gets applied as a mask to the linear (non-stretched) luminance channel. The sole point is to highlight “supersaturated” stars that wouldn’t make a good PSF. Last but not least, the traditional StarMask process is run to capture the bigger/brighter stars for deconvolution support.
When the script finishes, it opens a deconvolution dialog with my favorite parameters (25 iterations, global de-ringing at around 0.002 and support set to the star mask at about 0.2). It also opens the DynamicPSF process and sets focus to my luminance channel.
The only thing left to do is apply the star mask to the main image, open a preview window and tweak decon settings until it looks right. The stars should “tighten” and be less fuzzy around the edges. If you get rings, you can do a combination of reducing iterations, increasing global dark and increasing deconvolution support to remove them. This is my last step in linear processing. The rest of the work happens on the non-linear or stretched image.
Stretching
There are more ways to stretch an image than can possibly be useful, and I found a script that I keep coming back to. Check out easy and effective noise reduction in PixInsight for more info about the EZ Processing Suite. It’s great! I use the EZ Soft Stretch to get to a starting point.
💡Tip: it’s tempting to go with the darkest background possible, but then you risk losing some details in your image. I always go with a background a bit noisier than I’d like and tweak it down after the stretch.
Here’s the galaxy after the stretch:

Final processing
Now my life is about improving contrast and color, removing noise and diminishing the background. First, I ran my non-linear stretch script several times. This will extract the luminance and invert is as a mask, so the light areas have the most protection and the dark areas have the least protection. It then applies a curves transformation to subtly bump the image in a direction. You can specify how much happens in an iteration, and my best practice is to drag the instance handle onto the desktop, then drag that onto the image several times until I reach the desired result.
I also want to tweak the galaxy without creating side effects for the background, stars, etc. The RangeMask tool is handy for this, as I can create a smoothed mask that just covers my galaxy (and, apparently, a pair of bright stars).

This mask allows me to tackle things like LocalHistogramEqualization and High Dynamic Range Wavelet Transform (HDR) on the galaxy without impacting surrounding objects. I also use PixelMath to combine this with the star mask and I call it my “magic mask.” I use the magic mask to protect the stars, galaxy, and nebulae so I can attack the background via de-noising and/or manipulating curves.
For this production, I ran into an issue where I was trying to darken the background to get rid of some light pollution, but the changes left the galaxy with an unnaturally sharp edge. There was just too much contrast at the edge of the galaxy! I accidentally found the answer to my dilemma. Earlier, I mentioned growing the stars in the generated star mask for better coverage. You can also pick a mode called erosion that effectively shrinks stars. I left my star mask off, and instead use the range mask to protect the galaxy and surrounding stars. Then, I ran the Morpohological Transformation and it reduced the background noise and effectively faded it out.
My last step was to run the “Enhance Dark Structures” script to increase the contrast of some of the dust lanes. I then exported it as a TIFF and ran Topaz Denoise AI for a final wave of noise reduction.
I hit the moment I was waiting for, and was not disappointed.

I hope you enjoyed the read and received some value or benefit. Until the next one,
Jeremy
Post categories: Related tags: