
August 18, 2021 1341 words 5 minutes to read
Planning Mosaics with Telescopius and Processing with AstroPixel Processor
Summary
I recently captured an image of the veil nebula that required multiple panels to be assembled in a mosaic. I planned it in Telescopius with just a few settings. In this post, I’ll walk you through how I set it up and processed it.
Plan the mosaic
Planning the mosaic is more straightforward than I expected. The key is to know the specifications for your telescope, camera and/or eyepiece.
Configure your telescope
The first step is to configure your telescope. The easiest way I know how is to open any target and scroll down to the “Telescope Simulator” section. There, you can click on “Astrophotography” and the telescope icon, then choose “Add/remove.”

This takes you to a page with telescopes and lenses, cameras, mounts, eyepieces, and more. Click “add” on telescopes. There, you can enter the key details of aperture, F-number, and focal length (it allows for a range). These are the specs for Stellina:

Configure your lens and/or sensor
The next step is to enter your eyepiece and/or sensor (camera). Stellina only has the sensor, so I enter that information.

Check the rotation
The trickiest part is figuring out how the image is rotated. With the information entered, I use the query feature to find an object I’ve already photographed. In this case, I chose M13: The Great Globular Cluster in Hercules. It’s an easy target to capture in my location and has two distinct, colorful stars for orientation. I scroll down to the Telescope Simulator, click “Astrophotography” then choose my telescope using the telescope icon and my sensor using the camera icon. This will overlay a green “field of view” like this:

Notice the position of the cluster and orientation of the yellow and blue stars. Here’s an unprocessed frame from my telescope:

The orientation and positioning match! If the square is oriented differently, I simply use the rotation slider on the lens dialog to rotate until they match.
Create the mosaic panels
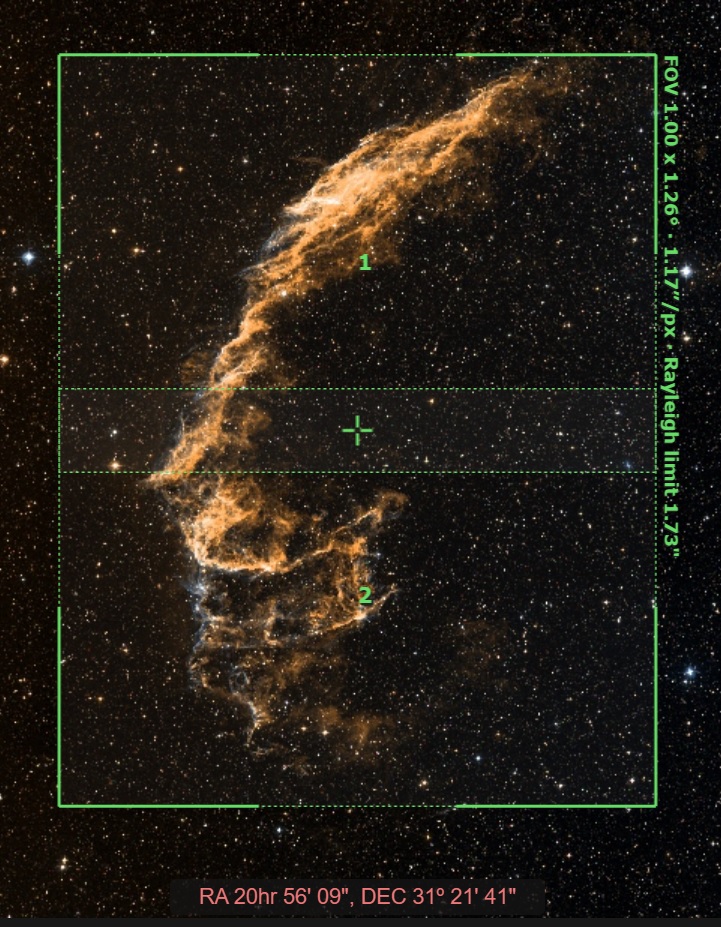
My target of NGC6992 is larger than the field of view. The bottom half is cropped out.

Now I can tap the grid icon that initially shows 1x1 to plan my mosaic. You specify the grid dimensions and overlap. I like a good overlap of 20% but it is common to use 5 - 15 percent as well. Once I’ve reconfigured it to a 1x2 grid, I can scroll the field of view until the nebula fits inside the mosaic. Here are the mosaic settings:

And this is what the field of view looks like:
Now I have everything I need to capture the mosaic! It is helpful to toggle on “include center coordinates” as they’ll come in handy later (I’ll explain).
Capture the mosaic
I use the coordinates provided in the mosaic planner to create manual targets in Stellina. For Stellina owners, there is an option in the target finder to enter “search with coordinates.”

There, I input two targets I call “veil top” and “veil bottom.” For larger mosaics I just name the panels by number (i.e., panel 1, panel 2, etc.). I enter the coordinates exactly as they appear in the planner.

Then it’s just a matter of pointing and capturing images. I ended up capturing 385 10-second exposures for the “top” frame and 427 for the “bottom.”
Produce the mosaic
With all of the raw materials in place, I could now move on to assembling the mosaic.
Stack the images
The next step is to stack the images. There are several options to do this (DeepSky Stacker is free, PixInsight and AstroPixel Processor are both paid and licensed products). I prefer AstroPixel Processor. I treated each panel as a simple observation and stacked them using my default settings. The steps at a high level involved:
- Load my light images and my dark images.
- Calibrate and turn on Cosmetic Correction. I used a “hot pixel kappa” of 6.0.
- Analyse stars all defaults.
- Register all defaults.
- Normalize I prefer to turn off background neutralization and do that myself.
- Integrate here I tweak two things: I pick 90% of images so some bad ones can get thrown out, and I use Bayer/Drizzle at 3x to produce a high resolution image that I can shrink later.
I configure my settings then go straight to the Integrate tab and run them all at once. This produced two images, the “top” and “bottom.”
Pre-process the panels
Here is the “top” panel aggressively stretched to reveal a light pollution gradient and noisy edges.

My first pass I just combined the panels and the gradient was next to impossible to remove. So, I started over. This time I cropped and applied Automatic Background Extraction to each panel before combining them. Here is the “top” panel artificially stretched again to show the gradient removed.

There are multiple ways to combine the panels, but again I used AstroPixel Processor. I went through the same steps but with different settings.
- Load loaded my two light panels, top and bottom. No darks because they’re already calibrated.
- Calibrate no Cosmetic Correction (already done).
- Analyse stars all defaults.
- Register I find changing from quadrilaterals to triangles works better for mosaics. I move scale start to 5 and scale stop to 10. I check “use dynamic distortion correction” and turn off “same camera and optics” (even though it is, this helps to better blend the images). Registration mode goes from “normal” to “mosaic.”
- Normalize again, no background neutralization.
- Integrate stack 100% (there’s only two images!), set LNC degree to 1st degree with 1 iteration. Check “enable multi-band blending” and slide it to 20% (because the panels overlap by about 20%). Mode is interpolation with a scale of 1.0 because I already scaled the panels.
Here is the mosaic that was output before processing. You can see how well the panels blended.

Wrapping up
I used PixInsight for post-processing.
- Rotate
- Crop
- Dynamic background extraction
- Background neutralization
- Photometric calibration - this is where I input the “center” coordinates from the mosaic planner to make it easier to plate solve the image
- TGV Denoise
- Multiscale Linear Transformation on luminance and chroma
- Deconvolution
- EZ Soft Stretch
- Curves transformations
Finally, I exported the panel as a TIFF, reduced the noise in Topaz DeNoise AI, scaled it down to 50% of the size and saved it as a JPG.
You can see the final result in the gallery.
Post categories: Related tags: